Showing posts with label family time. Show all posts

Monday, March 3, 2014

Meal Plan Monday - 3.3.14


Afternoon!  <---Just the fact that I am writing that on 'meal plan Monday' signifies how my day is going.  I didnt have time to prep a post yesterday so I am actually writing AND posting this on Monday lol!  Since the weekend was so hectic, meal planning consisted of, 'hmmm...what do I have in the pantry???'   

This week, I am using Tory's meal planning tool - because I sooooo need the organization in my life! You can read about the tool here!  After careful consideration, I decided on the following:


Monday - Tomato Soup and Grilled Cheese (V-6)
Tuesday - Creamy Chicken Noodle (P-14)
Wednesday - Cheeseburger Pie (B-8)
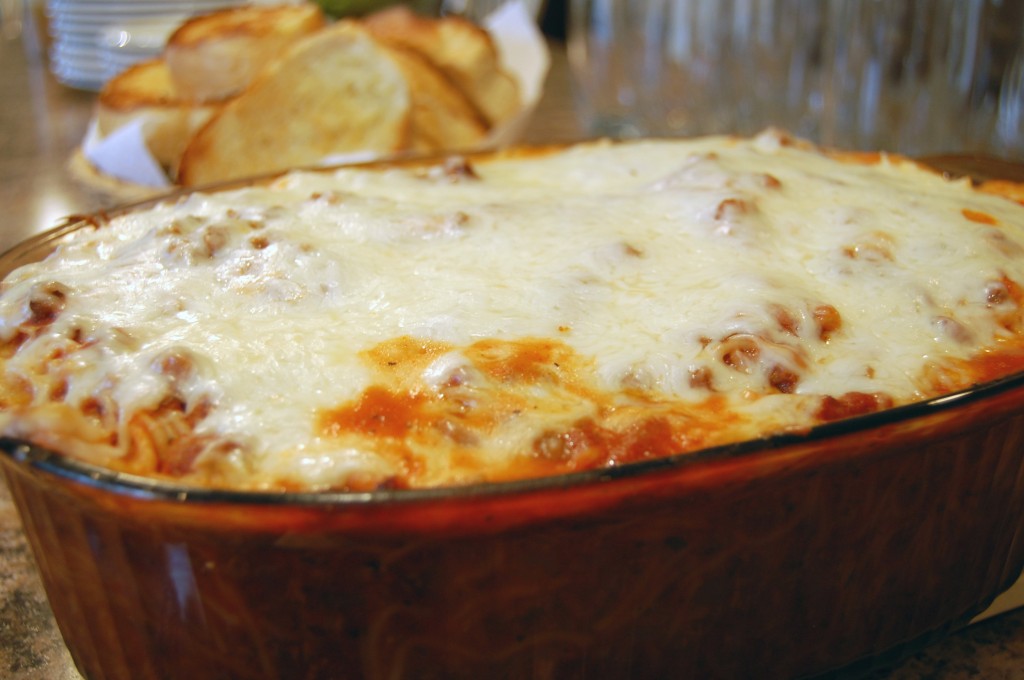
Thursday - Spaghetti Bake (G-6)
Friday - Smothered Pork Chops (D-8)
**the letter number combos here signify a recipe in the tool - open the pdf files, and click ctrl + f, then type in the combo and it will take you right to the recipe!**


Now, when you go view the tool, there is a link for the pdf files (also HERE) that you can print out, so you can hold them. I find thats easiest. If I had more motivation, I'd laminate them so I could just toss them in my purse and use a dry erase marker to cross things out as I pick them up at the store.  But....that's motivation for another day lol!  

Each meal has a recipe card, and an ingredient card. The ingredient card is split between what you need, and what you probably already have.

Monday - Tomato Soup and Grilled Cheese
*there is a recipe for making the soup homemade, but #gymnasticstonight so...it had to be fast.
Things you need: 2 cans of tomato soup, Milk, Bread, Cheese, Butter
Directions: 
  • Pour soup into saucepan, add milk, heat
  • Heat a pan on the stove
  • Butter one side of one bread, and place butter side down in pan.
  • Layer cheese, and second piece of bread (buttered on the outside)
  • When cheese is melted, flip sandwich and toast other side. 
  • Serve a cup of soup, with a sandwich to dip in it. 
Tuesday - Creamy Chicken Noodles with Salad

Things you need: 4 boneless skinless chicken breasts, 2 cans cream of chicken soup, Egg noodles, Salad veggies, Salad dressing, Spinach, Butter, Chicken broth


Directions: 
  • Combine 3-4 boneless, skinless chicken breasts, 2-10.75 cans of cream of chicken soup, 1/2 cup of butter (sliced) and 42 oz. of chicken broth in your crock pot. 
  • Cover & cook on low for 8 hrs. 
  • An hour before serving, remove the chicken, shred it (You can do this easily by putting it in the kitchen aid mixer) and return it to the slow cooker.
  • Stir in the noodles, cover and cook another 30 minutes. Once they are cooked to your desired consistency, you are ready to serve!
  • Place spinach, veggies and dressing in a bowl, and serve with dinner.

Wednesday - Cheeseburger Pie

Things you need: 1 ½ lb. ground beef,1 can cheddar cheese soup,1 can cream of anything soup, 3 carrots, 1 large onion, 1 tbsp. mustard, 2 tbsp. ketchup, 1 large bag frozen French fries

Directions:

  • Preheat the oven to 375°F. 
  • Brown ground beef in a skillet with garlic and diced onions. Stir in grated carrots. 
  • Combine condensed soups, milk, mustard, ketchup in a large bowl, stir in beef mixture. 
  • Layer on the bottom of a large, deep casserole dish. 
  • Top with bag of frozen French fries. 
  • Bake until fries reach desired crispiness, about 45 mins to an hour, depending on type of fries used. 
  • Let sit for 5 mins, serve.

Thursday - Spaghetti Bake

Things you need:1 pkg spaghetti, 1 jar spaghetti sauce, 2 diced tomatoes, 1 onion, 1 ½ lb. ground meat of choice, Cheese for shredding

Directions:

  • Preheat oven to 375°F. 
  • Cook spaghetti according to package directions. 
  • Brown ground beef and onion in a frying pan; drain. Stir in diced tomatoes and a jar of spaghetti sauce of choice. Mix with cooked spaghetti. 
  • Pour into a greased casserole dish. Top with shredded cheese and a sprinkle of Italian herbs and a few grinds of black pepper. 
  • Bake 20-25 mins until cheese is well browned and bubbly.

Friday - Tyler Florence’s Smothered Pork Chops
Things you need: 4 ¾” thick pork chops, Buttermilk, Chicken broth, Fresh parsley, Sweet potatoes, Green beans, Flour, Onion powder, Garlic powder, Cayenne pepper, Salt, Pepper, Olive oil

Directions:

  • Put the flour in a shallow platter and add the onion powder, garlic powder, cayenne, salt, and pepper; mix with a fork to distribute evenly. 
  • Pat the pork chops dry with paper towels to remove any moisture and then dredge them in the seasoned flour; shaking off the excess
  • Heat a large sauté pan or cast iron skillet over medium heat and coat with the oil. 
  • When the oil is nice and hot, lay the pork chops in the pan in a single layer and fry for 3 mins on each side until golden brown. 
  • Remove the pork chops from the pan and add a little sprinkle of seasoned flour to the pan drippings.
  • Mix the flour into the fat to dissolve and then pour in the chicken broth in. 
  • Let the liquid cook down for 5 mins to reduce and thicken slightly. 
  • Stir in the buttermilk to make creamy gravy and return the pork chops to the pan, covering them with the sauce. 
  • Simmer for 5 mins until the pork is cooked through. Season with salt and pepper and garnish with chopped parsley before serving.
That's my monday through Friday - Saturday and Sunday are leftovers from the end of the week, and fun days. We will pack leftovers in lunches all week, so there may not be much left by the end of the week!

Grocery List:  
Meat

  • 4 boneless skinless chicken breasts
  • 1 ½ lb. ground beef
  • 1 ½ lb. ground meat of choice (I'm getting ground beef so I can get a 3 lb roll)
  • 4 ¾” thick pork chops

Soup

  • 2 cans of tomato soup
  • 2 cans cream of chicken soup 
  • 1 can cheddar cheese soup
  • 1 can cream of anything soup
  • Chicken broth - I like bullion cubes so I can make as much as I want
  • 1 jar spaghetti sauce

Noodles

  • Egg noodles
  • 1 pkg spaghetti

Dairy

  • Milk
  • Cheese
  • Buttermilk - or you can make it with reg milk and lemon juice here
  • Butter
  • Vegetables
  • Spinach
  • Salad veggies
  • 3 carrots
  • 2 large onion
  • 2 diced tomatoes
  • 1 large bag frozen French fries - or a bag of russets, chopped like fries
  • Sweet potatoes
  • Green beans

Other

  • Salad dressing
  • Bread
  • 1 tbsp. mustard
  • 2 tbsp. ketchup 
  • Fresh parsley 
  • Flour
  • Onion powder
  • Garlic powder
  • Cayenne pepper
  • Salt
  • Pepper
  • Olive oil


And....now I need to sign off and make dinner!! Let me now how these work out for you!

~Danielle 


Saturday, October 19, 2013

October 19th, 2013 - Weekend Edition - Get Planning Your Meals - Part 1

Hi Ladies,

Welcome to a little mini-series on Meal Planning.

There will be two parts to this:
Part 1: Introduction to Meal Planning and Before You Start
Part 2: Dinners - Tackling Family Meal Times

Stop back each week for the next installment.


Introduction To Meal Planning


What is it?  A way to simplify your life by setting out the menu for your week on Saturday or Sunday and then following the plan.

What are the benefits?
  • Reduce food waste and save money!   The US wastes $165 BILLION in food waste every year! $2275 per family of four. Read more here.
  • Save even more money by reducing your reliance on convenience foods like frozen meals and take out
  • Simplify your life
  • Reduce stress
  • Make after-school and work activities nights easier on everyone
  • Improve your overall health by reducing your consumption of overly processed and overly salty foods
  • Re-introduce a food-based culture into your family
  • Lose weight without a costly program - What? Yes. If you plan smart, portion controlled meals throughout the day and stick to your program, you can diet smart without your family even really realizing you are on a diet. Trust me, I've used this theory to lose 20 lbs (150 to 130 lbs, dropped my BMI to 22) and then maintain my weight loss, and my husband never complained he was on a diet, and he was eating the same food as I was (albeit at much larger portions!) 
    Note: a particularly sneaky wife could probably get hubby to lose weight without him realizing this way...
Wait, a what-where-who culture?
A Food-Based Culture. The rise of obesity in North America and elsewhere can be directly linked to increase in convenience foods since the 1960s or so and the demise in the family dinner. When convenience foods started emerging, the time spent in the kitchen decreased. Just think, your great-grandmother spent all day baking bread and making a family meal. Her daughters helped out.  The centre of the family home was the kitchen, and everyone came together for not one meal per day or week, but 2-3 meals per day!!
Fast forward to today, and most families don't even eat dinner together. Not only that, but tons of people have no idea how to make the most basic things, let alone baking their own bread!!
The loss of contact with our food - how to prepare it and how to be in control, coupled with the loss of family contact and interaction has made us unconscious eaters - we mow down on our Big Mac and Fries on the way to Jimmy's soccer game in the car while driving, rather than sitting down with Jimmy and eating something nutritious that will give him good energy fuels for his game while talking about how excited he is and encouraging and bolstering his confidence.

No way, I can't do all that!
Yes. Yes you can. By planning ahead and making quick easy meals for game-nights, and saving the pot roast for a quiet night, you can serve your family wholesome and nutritious meals, with the ingredients you want, in a snap.

But I'm not making my own bread. No way.
Not a problem. I would encourage you to try it though. I can make a loaf of bread in my breadmaker between the time I get home from work and the time I go to bed (about 5 hours). I get home, fill up my breadmaker with the recipe I want (a family-favourite is a multi-seed bread) and then we have fresh bread for the next two to three days for my current family of 2.

Isn't this going to take time away from my kids?
No. You have a few choices here. Homework time can be while mom cooks, with everyone seated around the kitchen table working on their work (and also nearby in case of questions). Or, get the kids involved in the cooking!! There are fabulous products out there like the Pampered Chef My Safe Cutter which will let young kids help with chopping (as long as you don't mind strange shaped carrot pieces). Kids also love to mix, stir, measure, roll, and of course, taste!! Not only is it fun to cook with your kids but its educational - they are learning life skills of cooking, and maybe a bit of chemistry too!

Not convinced yet?? I challenge you to try it for a month. Just one month. I promise, once you get the hang of it, you will enjoy the control and planning in your life. If you are a very strong Myers-Briggs P type, this may never be for you. But try it.... maybe some of my 90% J will rub off ;)

Before You Start


What? I can't just start?
Well, you can. But lets call this the program with training wheels. Or really, what it is, the "Empty the Pantry" part of the program.

Your Planning Board

OK - to really keep with the plan, you need a meal planning board, or a weekly menu board, to outline your dinners on.

Some great inspiration can be found here and here and even a horizontal version here. A quick google search will find you even more.

Wait? Not the crafty type? Me either. (OK I lie, but easy got hold of pregnant and lazy me on this one!)

So you can either make something like my linkies above, or you can go my way and make one like mine (detailed below).

Either way, make sure your menu board has the following things on it:
  • A place to put the meal for all 7 days of the week
  • Some way to stick said meal to the spot it is allocated to.
    Great ideas for this: magnets, clothespins, velcro (OK, thats expensive!), see through plastic pockets (good if you have a food chucking toddler around) or push pins (not the best if you have said toddler around)
  • A place to stick your shopping list pad
  • A shopping list pad  (spend the extra $$ and get the sticky post its. Trust me. I will explain all soon)
  • big pocket of some sort to hold all the meal cards you will use
  • A title. OK - you don't need a title but I mean, you want it to be pretty and you don't want people to say "What the heck is this board without a title?". Yep. I'm a bit of stickler.

My Planning Board

So, as I wandered the halls of Wal-Mart looking for the perfect magnetic board for me to use, I stumbled upon these gorgeous Quartet 14"x14" Black magnetic dry erase boards, with NEON dry erase pens. I was in love. True love.  And it was $10 (that's CDN!). I was SO excited because even my magnetic paint cost me $20 for the little tiny container.

So I settled, right then and there, to totally change my plan of awesome gorgeousness.


Further exploration found these cute push-pin look magnets, in NEON! I had to have them, and at $2 for 10, who was going to complain??

Then off to the shopping note pad section. I settled on 4"x6" as it looked best on my board and was a very common size (easy to find in the future). I ended up getting these at Staples because of a debacle with the ones I had picked at Wal-Mart. They are sticky Post-its but Staples brand ones (although I kind of wish I had gotten the pretty neon stack, in the end my inner cheapskate won that argument and I bought plain yellow).
Why sticky? Because they stick to my board, meaning I can mount just a few papers at a time and hide the rest so that my grocery pad doesn't disappear too quickly.
Also... there is nothing better than driving around the grocery store with your list stuck to your hand, cell phone, cart... forehead?  Whatever. Its quick and easy and remains accessible. I mean, once I have a kid, I could stick it to his forehead... HMMMM.

Anyways, I digress.

So total cost for my board:  $12+tax
Cost for 250 grocery notes: $8+tax

Thats $20 on my fancy schmancy board!

Empty the Pantry (and Freezer) Program

The first and most important step to any life change is to ENABLE IT.  Commit and make it happen.  And as long as you have those Lean Cuisines, boxes of chicken nuggets and goodness-knows what else in your freezer, they are there. Tempting you to abandon your plan. So they need to go.

So here are the steps to take. You may need to rinse and repeat over a few weeks if your house is jam-packed with junk like mine is. 
Note: if you are an "extreme couponer" or a "hoarder" of grocery items like BBQ sauces, skip the pantry analysis portion and just focus on the fridge and freezer. When you do your weekly shop, compile your list based on your meal plan, and then shop first in the stockpile, crossing off whatever you have, and then shop second at the grocery store, mostly for your fresh items.  If you have a freezer stockpile too, then... make it work sistah!!

Start this program on a Saturday or Sunday

  1. Take an inventory of what you have in your fridge. Discard anything that isn't edible any more. Anything in there that you don't use often, either chuck it out or find a recipe that will make it work.
  2. Any ingredients you want rid of from step 1 and have found a recipe for, put those on your meal plan for dinners this week.
  3. Head to the freezer(s). Empty those babies out. 
    Feed the kids 20 popsicles, ice lollies and freezies each to get rid of that colossal waste of space.  Send the kids to grandma's all hopped up on sugar. You and daddy-o finish off all the bits of ice cream. Or, make an ice cream cake
  4. Based on what you find in the freezer, chuck or keep everything. The things you keep, work them into your meal plan.
  5. If your menu isn't completely full for the week, head to the pantry. If it is, stop there, add some fresh veggies to your meals for the week (unless you are hoarding frozen veggies, I am terrible at that)
  6. In the pantry, same process. If you bought a souvlaki marinade for meat 2 years ago like me and you haven't used it, put it on that meal plan. Now is the time ladies!!
So as I said, rinse and repeat until you have gotten rid of most of the bulk and surplus foods you have in your pantry, freezer and fridge, especially the overly processed convenience foods. 

If you're having some anxiety because your freezer is bare and your pantry looks empty, don't worry. We will fill it back up, I promise.

In the mean time, if there are any great deals on foods you want to stock up on that are not overly processed AND you have room in your freezer or pantry (this is not for fridge foods ladies, those expire too quickly), go right ahead.

I would recommend that you buy a kitchen scale if you see one on sale to help with portioning bulk meat

Foods you are allowed to stock up on:
  • dried pasta of any sort. Preferably whole wheat or other "fancier" pastas like the tri color or spinach fettucine, but if your family will only eat white pasta, then OK
  • rice - you are going to want a few varieties, namely a long grain like basmati and a quick cook rice like brown rice quick rice. If you don't want to eat quick rices, just stock up on a long grain and a medium grain rice of choice.  Wild rice is another option you can easily add in, as is any bagged rice blend. 
  • Other grains if you like them - quinoa, bulgar wheat, etc. If you eat them, they can be substituted in our meal planner for any meal that says "and rice" or any meal that says "and pasta". I specifically did not include these grains in the specific recipes since a lot of people are not comfortable with their use
  • boneless skinless chicken breasts - these are a big source of protein in our meal plan so go ahead and buy. Freeze them in good freezer bags in packs of 2 and/or 4, or by the pound. Mark on the outside
  • boneless skinless chicken thighs - these can be substituted for breasts in any recipe and are cheaper. Pack them by the pound
  • Pork - chops, loins, shoulders, bacon, hams - if there is a farmer nearby who sells a whole pig type deal, you can definitely go with something like that to get a variety of cuts. The menu planner uses a few different cuts mentioned above, but if there is some part of the pig you like to use or that you get that we don't have a recipe in the planner for, you can add it your self and then share with the rest of us
  • Beef - again, you could buy a quarter or so, but a whole cow is a bit much for most people to store. The main cuts you will need is ground, stewing meat and roasts, with a selection of a few steak meals, and again, add more if you like
  • Ground meat - why is this its own category? Because you can make a ton of things with different ground meats. So stock up and package by the pound, 1 1/2 lb and 2 lb packages of ground turkey, chicken, beef, veal, pork, boar, bison, venison, etc
  • Frozen vegetables - spinach, corn, peas, mixed veggies, broccoli - these are all staples you can use any day as the vegetable side to your meal. Don't feel like salad? Switch it up with frozen veg, they take no time to prepare and are often more nutritious than a fresh version. Why? Individually quick frozen (IQF) green beans are frozen within 8 hours of picking. In that same time, the beans lose 50% of their Vitamin C. And unless you're out picking them yourselves, you are not going to get fresher! 
  • Canned staples - diced tomatoes (no salt added, packed in juice), tomato sauce (watch the sodium and additives!), canned corn (vacuum packed, no salt added), beans and chick peas (no salt added, in water, or select dried versions to save even more money) are all staples you will use from time to time, so keep a few on hand
  • Spices - this is only on here if you are not a spice and herb user. If you have a well-stocked and relatively fresh supply of spices, don't worry about this. You can add spices as we go. The best way to start an herb and spice collection is to buy a spice rack and fill the jars by buying your spices at the local bulk store (Bulk Barn in Canada). Spices are best in the first 6 months, so don't bother buying in bulk unless you are a caterer. To start, you need a nice pepper grinder and some peppercorns. Personally I like a blend of colored peppercorns. Then herbs I recommend include: Italian herb blend or Italian seasoning (salt-free), oregano, basil, thyme, parsley and perhaps dill (I personally hate dill). Then some other spices you will need are chili powder, cumin, red pepper flakes, cayenne pepper (skip if you don't like spicy-hot), paprika, meat tenderizer and a nice spice blend for meats and beef (i.e  Montreal Steak Spice). If you are tight for cash and can't afford to stock your pantry all at once with spices, buy them bit by bit as you need them, and feel free to Google or message us for suggested substitutes.  
  • Pantry Staples - these are the basics, and again, stock up if you have the money, or buy as needed. These include at least two oils - olive oil and a vegetable or canola oil, vinegars - balsamic, red wine and white at least, soy sauce, chicken/vegetable and beef broths, and your basic condiments - ketchup, mayonnaise and mustard. I would suggest at least a yellow mustard and a Dijon, the world of mustards is huge and we have about 5 varieties in our fridge. Of course sugar, salt and flour should be present as well.
Those are the basics you will need. Of course there will be a lot of emphasis on fresh in the meal planner, and always choose lower-sodium options, and fruits and veggies packed in their own juices or vacuum packed over packed in syrup or brine. 

For kitchen equipment, hopefully you have most of the essentials you will need - pots and pans with lids, mixing bowls, a good cutting board and few nice knives, random gadgets. PLEASE go out and get a garlic press if you don't have one. There is nothing like fresh garlic both from a taste and a nutrition standpoint. 

In Summary

You should meal plan because it will make your life easier and less stressful. It will give you a sense of organization, and send you on a purposeful trip to the grocery store. Start by making a meal planning board and practice using it and planning meals to empty your pantry and freezer of many of the salt and preservative-laden convenience foods you have come to rely on.  If you are a couponer or a deal-seeker, start stocking up on the ingredients mentioned above. Make sure to portion the food out into usable sizes, and label well. (See Meal Planning -extra tips when released for more tips on shopping smart and food portioning). 

Wednesday, October 16, 2013

October 16th, 2013 - Family Fun Time

At the Poenisch house, most of our nights are spent getting into some mess or another.  So when my daughter asked if we could do an experiment, I grabbed the cornstarch, and figured we'd make something up.
 
The ingredients for this were:
- Cornstarch
- Water
- Bowl
- Something to mix with
- The space to make a mess
253954_927864830446_1474456612_n

We talked a little bit about solids and liquids before we started.  My three year old was able to easily understand that water was a liquid and cornstarch was a solid.  We didn't get to complex with matter though.  We explained that liquids don't have a certain shape, and they flow.  We tipped our measure glass back and forth and watched the water move.  We talked about how solids have their own shape, and are hard when we touch them.  Then we poured some cornstarch in the bowl and touched it.  We spent a few minutes having Isabel identify other solids (her blocks, and her cat...well, close enough anyways) and liquids (her bubble bath and apple juice).
 
538054_927866926246_1728409793_n
 
We poured some cornstarch in, and added a bit of water.  Isabel stirred it until it was too stiff for her to stir, so I took over.  I mixed it until it was thoroughly mixed.  Then we talked about solids and liquids again.  We poked and prodded the cornstarch water mix.  We talked about how it felt solid when we touched it.  We even squeezed it in our hands, and watched it go from solid to dripping.
 
pizap.com13581717045171
 
At this point, she asked what would happen if we poured more water in, so I told her to go ahead and pour more water into the bowl.  She mixed it up, and was less than thrilled to see that the cornstarch suspension seemed to have lost it's magical half solid, half liquid properties, and was now all liquid.
 
486374_927866437226_541974938_n
Her papa's explanation of how the molecules are no longer lining up when she touches it, and that's why its not firm anymore did not help her.  So this is where it gets interesting.  Isabel turned and asked, 'Mama? How can we make it feel hard again?'  I figured this was a great time for the scientific method, and so off we went on our adventure.  Here is the simple version of the scientific method we use with our little lady.
overview_scientific_method2
 
Isabel has asked the question - how to make it firm again, and sort of did the research backwards (prior to asking the question.)  We reviewed what we had learned already about the suspension of cornstarch and water.  We talked about how each had felt separately, and how they felt when we mixed them.  Isabel described what it felt like to poke, and to squeeze after we had mixed the two, and the again stated her dismay at the cornstarch turning all liquid when she added more water.  Her next step was to come up with a hypothesis - a proposed solution, and then to test that idea.  Her hypothesis was to squeeze the mixture.  This was a pretty good idea, since with the first round, when it is squeezed, it becomes firm.  We were proud of her for thinking of it.  She dug her hand in, and squeezed.

544021_927866606886_298896993_n
 
No dice.  She was not impressed when it ran out of her hand like water.  Her conclusion was that squeezing it was not a successful solution to make it hard again.  Though, I think she put it something like, 'well. That didn't work. What now?' So she thought some more.  Her next solution (hypothesis) was to pour more of the cornstarch in.
 
18997_927866806486_1305289653_n
So, we poured some in, and she mixed it up.  Then, when it got too stiff for her, I mixed a bit.  She tried touching it, and...
481228_927865603896_251062228_n
Success!
Her second hypothesis was successful and correct.
She was very proud of herself, and so was I (she's my only smallie :) ) and because we were now satisfied with our experiment, we spent the next twenty minutes or so just playing in the mixture.
545222_927867500096_1146121559_n

400054_927865923256_1485069196_n
After we finished playing in the cornstarch water mix, we called in the troops (daddy) to help clean it up.  Everyone had a lot of fun, and it was a great hands on learning experience for our little lady.
 
Enjoy!

~Danielle

Tuesday, October 15, 2013

October 15th, 2013 - Frugal Living, Budget pt. 3

Hello again!! This week, we are working on the functionality of your budget.  You've had a week now, to think on things, and see how they are going.  What you will need this week if your spreadsheet, and your check book, or however you keep track of expenses. 


First things first, look through your budget once more.  Make sure you are meeting all your needs - and make sure you are paying yourself.  Some people like to put aside a certain percentage of money each month, and some people select a dollar amount.  At our house, we have set dollar amounts that go into our emergency savings, 3 month savings, then our 'whatever we are saving towards right now' and our daughters savings account.  Those don't vary, and if need be, we cut from other areas first before cutting from savings.  We also put the grace money that isn't used into our savings each month. 

After you make sure you get your savings sorted out, go through your budget and consider where you can make cuts.  For instance, maybe you go out to eat as a family once a week - eliminating one time out to eat, or even two, can often add $50-$100 to your ability to save each month. I know in our budget, we were able to cut our gas costs by a third each month, just by altering our work schedules so that my husband could drop my daughter and myself off each day and pick us up.  We also cut down eating out to twice a month, as well as started meal planning, which has saved hundreds of dollars alone. 

Another thing that helps is setting an allowance of sorts for everyone.  We don't have a lot of weekly costs, so we each take out $20 a week for discretionary spending.  It is much easier to turn down lunch out at work when it will use all of your spending money, versus just swiping a card.  Keeping daily discretionary spending to cash only is a fast, efficient way to cut down on spending.

Now that you have freed up some money, gather your cc's.  If you have none, that's great. If you have some but maintain a zero balance, even better!  If you are like most of middle America, you are fighting a losing fight to pay down the debt.  So, sit down, and write down all of your cards, their balances and their interest rates.  Pick the one with the highest balance, and pay as much as you can (while still paying yourself first) towards that card.  Maintain your minimum (or higher, if you can) payments on your other cards, and just move towards carrying a zero balance on all cards.

One last tip. Make sure your spouse is on board.  Budgeting and becoming debt free can be very stressful and frustrating - don't shoulder it alone if you have a partner. They helped you get where you are and they will help you better your position in life.

Hope this helps! Enjoy!

~Danielle


Wednesday, October 9, 2013

October 9th, 2013 - Family Fun Time - Epsom Salt Crystals

Hello! As we learned previously, my small one is eager to 1) Do crafts, 2) Do science experiments, and 3) Make a mess.  So, when she asked to do something fun, I turned to my husband for an easy activity.  He’s a chemist and often has ideas on simple, fun experiments.  These often make for GREAT family time and learning time as we all explore new ideas, and often discuss the scientific theory - which is almost always free, or cheap, as we are usually using household things in these experiments.  

He offered up this idea: Epsom Salt Crystals.  This was simple and easy – and very hands on for my curious three year old (thought she is four now, and still enjoys it).  We took 1/4 cup of Epsom Salt and 1/2 cup of warm water and mixed the salt until it was completely dissolved. The we added a tablespoon or so of Epsom Salt until no more would dissolve.


225327_950798985216_409177300_n
I mixed it in a measure cup with a handle so I could just hand it off to my little lady.  The idea is that they take a paint brush and draw on glass.  When the water evaporates, it leaves crystals in its place.  First, we tried this on the sliding glass door – which sounds like a great idea, but since we were not able to suspend gravity at our home, the water just ran down the window.  It still dried crystals, but since we couldn't keep the liquid concentrated in one area, it was not the most spectacular display.  This is also part of the reason you keep adding salt until no more dissolves – the more salt you can pack in, the better the crystals.
Next, we decided to try painting something that was horizontal so the water wouldn't drip down.  Isabel hunted out her hand held mirror, and painted the heck out of it.  We waited for the water to evaporate – which took about five minutes, and talked about how water evaporates, and hypothesized what we thought would happen.  When the water had all evaporated, here’s what it looked like up close:
OLYMPUS DIGITAL CAMERA
I have to be honest.  My husband assured me this would work, and it would look like frost.  I did not believe him, but in the end, we were sufficiently awed that it did indeed work, and it did look like frost.  Isabel thought it was wonderful that she could touch it and it wouldn’t melt.
This took a short amount of time – about 30 minutes for the whole endeavor, and Isabel was able to mix and paint herself.  The waiting was minimal, and easily consumed by curious conversation hypothesizing what would come next.  This could also be adapted for older kids, making a family night where you are drawing pictures, or being artistic in your own ways. 

Enjoy!

~Danielle 

Tuesday, October 8, 2013

October 8th, 2013 - Frugal Living, Budget pt. 2

Welcome back to how to get to D world in ten easy steps....errrr, I mean, building a budget and working towards financial health. Whichever. lol.

Today, we are just putting the budget together - in motion, so we can get right to it!

Take out all the hard work you did last week, and get it all together.  The first thing to do is look for a template that works for you. I have posted here three that I like from simple to more complex - choose one that fits you, based on your preferences.  It doesn't matter if you choose based on what is more easily formatted or which color you think is prettiest - choose one that appeals to you.  Once you decide, you can fill in all of your information - both fixed, and flexible spending, income, savings, and possibly a 'grace' amount, that allows for some error - or, you know, you are running late and decide a breakfast sandwich from McDonald's is going to be faster than making breakfast at home!


Once you select one, grab a glass of wine, or juice, and a quiet corner.  You'll want to take your time as you input things. Don't fret if you find you forgot something - just add it now.  Chances are this will be a moving, changing document for you.  When you are finished, put it all away, and take you mind off of it for a few hours, then go back to it, and just make sure you have everything you want or need in there.  Some people also like to list balances they are working on - such as credit card balances, school loans, home loans, etc, so they can see the number going down (hopefully) every month - it can be encouraging.  That's all we are doing this week! It doesn't seem like much, but it can be very taxing to see the input and outgo of your month, so after you are done, just relax and kick back!

Enjoy!

~Danielle 

Saturday, September 28, 2013

September 28th, 2013 - Freezer Meals

Good morning!  Today's post is a guest blog by our very own Jessica - She is a licensed social worker, who is preparing to meet a very lovely little belly bean in a few short weeks.  She is a frugal mama, who has very sweetly offered to share her freezer meal work up with us!  Take a moment to see more about who she is by stopping by her blog here and her website here, then swing on down to see how she does what she does!

From Jessica ~
Well hello there! If you have not tried freezer cooking before, you are missing out...yes it requires work and planning up front, yes it is a big mess, yes it is a long day of cooking, and yes your grocery bill will look bigger up front, BUT then it’s DONE! Done meaning, all you have to do is throw it in the crock-pot, oven, microwave, or warm in up stove top and dinner is DONE! Done also means you don’t have to go back to the grocery store for a few weeks to a month, and even then usually just for essentials (milk, bread, eggs, etc).  DONE also means (this one is high on my list) that there is not a huge stack of “prep” dishes to do every night!


I have to give shout outs to http://smithlive.blogspot.com/ and http://melissafallistestkitchen.blogspot.com as they have both been fundamental in my planning, recipe selection, and overall freezer cooking experience. I feel like I have taken bits and pieces from both of them and adapted it to my taste and style.  I would encourage you to look at their websites!!


For right now, it is me and my hubby, so I make almost all of our freezer meal portions for two, so most of the recipes are for 4-6-8 servings so I portion it into smaller servings (and therefore get more meals). I have done 3 rounds of freezer cooking and each one has turned out a bit different as a result, but generally I get 30-40 meals, not including breakfast and lunch tacos/foods for $200-300.


TIP: Check out your Sunday circulars...meat is what makes meals expensive, so we try to plan around sales on ground meats, chicken, and pork. I often swap the meats in the recipes for whatever is on sale to make it cheaper!

 
OK, to get started you need to choose your recipes.  (You can follow that link, or select Freezer Meal Recipes from the left hand side of the page.) This past time I chose about 15 and the time before that about 10 or 12. These do include some sauces and soups, which I made large portions therefore getting more meals. Again, it depends on how many you are cooking for. Smithlive often doubles, triples, or quadruples her recipes to make about 25+. Either way, the goal is usually a month’s worth of meals in one day, factoring in a day or two of leftovers and eating out.

 
TIP: Look for recipes that call for the same ingredients, especially if you are just starting out. For example, if chili powder, ground mustard, soy sauce and rice vinegar are not staples in your house, buying these for just one recipe is not efficient. This is also true of things you might not use all of (canned adobo chilies, cream cheese, bbq sauce, etc). Try to find 2 recipes that will use the same ingredients to help lower cost!


Because I have done 3 rounds of freezer cooking now, I am going to list all of the recipes that I have used; again, it’s up to you which ones you want to use, maybe even start with 10. Also, a good portion of your favorite recipes can be modified into freezer meals, so if you have something you love, try freezing it! Disclaimer: a few of these recipes are new this round, so I cannot vouch for how they taste/turn out.

TIP: I print my recipes and put them in plastic sleeves in a 3 ring binder. This means I can take them out (of the binder, not the sleeve) easily and they are protected from the mess I make in the kitchen!


Last thing before the recipes...decide how you are going to package things. I LOVE LOVELOVE LOVE my foodsaver system and use this for almost everything except casseroles. If you don’t have a Foodsaver system, ask for one for Christmas, and until then use heavy duty quart and gallon freezer bags.


OK, here is my list:

PORK

Chile Verde Carnitas

BBQ Pineapple Pulled Pork

Egg Muffins (BREAKFAST ITEM)

WW Breakfast Burritos (BREAKFAST ITEM)


CHICKEN

Monterey Chicken

Cafe Rio Chicken

Lemon Garlic Chicken

WW Chicken Burrito Wrap (LUNCH ITEM)

Baked Sweet and Sour Chicken

Brown Sugar Chicken

Sesame Chicken

Creamy Chicken and Rigatoni Primavera (can also leave out chicken for veg dish)

Cilantro Lime Chicken Tacos
 

BEEF

3 Packet Roast

Beef Stroganoff

Best Ever Beef Dip Sandwiches

Goulash

 
GROUND MEAT (We use turkey and chx a lot because it’s healthier, but it is not cheaper!)

Spaghetti Sauce

3 Bean and Beef Chili

Sweet Sloppy Joes

Almost Lasagna

Baked Penne


NO MEAT/VEGGIES
Taco Dinner Mac and Cheese

Twice Baked Potatoes

Spicy Roasted Vegetable Mac and Cheese (can add meat if you wish)

Lentil Soup


RECIPES

They are in alphabetical order. I have made notes in red- either changes I have made or notes on how to cook. If the majority of the directions are in red- do the directions in black and then stop when you hit the red. As with ANY recipe, read through all of the directions  prior to beginning.


COOKING

Use your judgment when cooking based upon the time you have and what you are using. Crockpot meals can be adjusted based on time and temperature. ALWAYS make sure to cook all meats thoroughly when reheating. If baking, usually 350 for 20-25 minutes is good and stovetop over medium high heat until cooked.


Please leave a comment or two - adding other great freezer meal information, or what you loved about this one!